In this tutorial, we are going to see how we can set up the Hashicorp vault. Also, we will see how we can use the vault setup with the Springboot application. Vault provides a secure storage mechanism for important confidential credentials like passwords, keys and secrets on top of it provides the authentication and authorization mechanism to access the credentials.
Prerequisites to setup Hashicorp vault
Installation
Download the vault package from the official website and follow the installation steps from the official documentation.
Hashicorp Vault Implementation steps:
Create the vault directory to store encrypted secrets
Create a folder with the name vault-local and add another folder inside the vault-local folder with name ./vault/data. You can use the below commands to create the folders.
mkdir vault-local
cd vault-local
mkdir -p ./vault/data
Create a config file
To run the persistence vault you need to set the configuration file as below. Create a file in vault-local the folder with the name config.hcl with the below contents.
storage "raft" {
    path = "./vault/data"
    node_id = "node1"
}
listener "tcp" {
    address = "127.0.0.1:8200"
    tls_disable = "true"
}
disable_mlock = true
api_addr = "http://127.0.0.1:8200"
cluster_addr = "https://127.0.0.1:8201"
ui = true
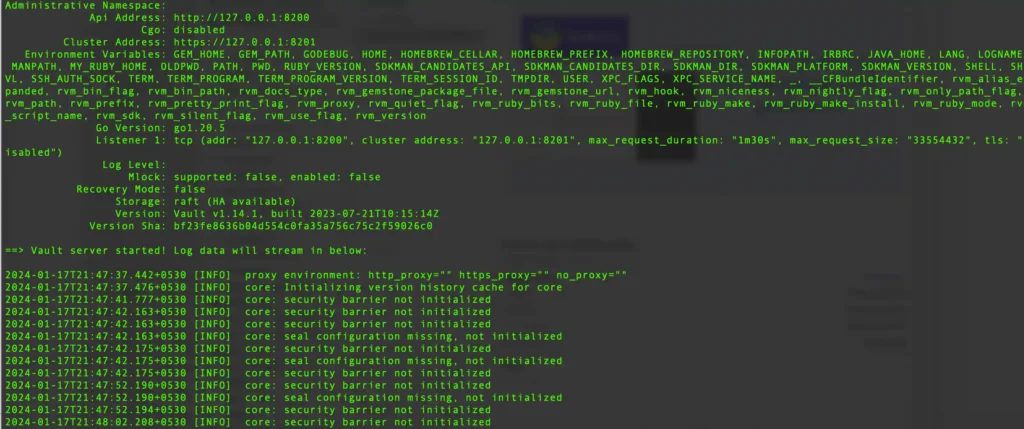
To start the vault server execute the below command. This command should be executed from the vault-local folder. This command is important whenever you stop the server and want to restart it again.
vault server -config=config.hclThe output will look like this

Add secrets to the vault
Now it’s time to add the secrets to the vault. There are two ways we can do this i.e. command line and using the UI.
Command line:
Use the below command to add secrets to the vault. here the secret-name is name of the secret you want to create. For eg. db-secret, user-secret, etc.
vault kv put secret/secret-name spring.datasource.database=moovetpay spring.datasource.password= spring.datasource.username=postgresIf you get an error as follows
et "https://127.0.0.1:8200/v1/sys/internal/ui/mounts/{your_secret} http: server gave HTTP response to HTTPS clientThen execute the following commands and try again
export VAULT_ADDR='http://127.0.0.1:8200'
export VAULT_TOKEN={your_token}
Using UI
When you start the server you can access the Web UI with the URL http://127.0.0.1:8200/. To log in use the keys previously noted while vault init and then use the token to log in from UI you can create the secrets.
Hashicorp Vault Integration with the Springboot
Pom dependencies
<dependency>
    <groupId>org.springframework.vault</groupId>
    <artifactId>spring-vault-core</artifactId>
    <version>3.0.2</version>
</dependency>
<dependency>
    <groupId>org.springframework.cloud</groupId>
    <artifactId>spring-cloud-starter-vault-config</artifactId>
</dependency>
Application properties
 Vault config
# spring.application.name=moovetpay_api
spring.cloud.vault.kv.enabled=true
spring.cloud.vault.authentication=TOKEN
spring.cloud.vault.token=hvs.thkAG4xMhGRi8BE9IjTppvhk
spring.cloud.vault.scheme=http
spring.cloud.vault.host=127.0.0.1
spring.cloud.vault.port=8200
spring.config.import: vault://


# DataSource Properties
vaultProperties.db.driver=org.postgresql.Driver
vaultProperties.db.url=jdbc:postgresql://localhost:5432/${spring.datasource.database}?useSSL=false&autoReconnect=true&useUnicode=yes&characterEncoding=UTF-8&characterSetResults=UTF-8
vaultProperties.db.username=${spring.datasource.username}
vaultProperties.db.password=${spring.datasource.password}
Config file setup
Code changes for Read and Write the Secrets to the Vault
Step 1: Add a config file
package com.project.config;

import org.springframework.vault.authentication.ClientAuthentication;
import org.springframework.vault.authentication.TokenAuthentication;
import org.springframework.vault.client.VaultEndpoint;
import org.springframework.vault.config.AbstractVaultConfiguration;

public class AppConfig extends AbstractVaultConfiguration {

    /**
     * Specify an endpoint for connecting to Vault.
     */
    @Override
    public VaultEndpoint vaultEndpoint() {
        return new VaultEndpoint();
    }

    /**
     * Configure client authentication.
     * Please consider a more secure authentication method
     * for production use.
     */
    @Override
    public ClientAuthentication clientAuthentication() {
        return new TokenAuthentication("token_here");
    }
}
Step 2: Service file import
Here is a sample code to save data into the vault.
/**
 * Imports
 */
import org.springframework.vault.core.VaultOperations;
import com.project.model.VaultKeyValueDTO;
...

    /**
     * Dependecy import
     */
    @Autowired
    private VaultOperations vaultOperations;
...

    /**
     * Usage
     */
    try {

        VaultKeyValueDTO vaultRequestDTO = new VaultKeyValueDTO();
        VaultKeyValueDTO.Data data = new VaultKeyValueDTO.Data();
        data.setPassword("password_goes_here")
        vaultRequestDTO.setData(data);
        vaultOperations.write("secret/data/" + savedProject.getId(), vaultRequestDTO);
        LOG.log(Level.FINE, "saved ");
    } catch (Exception e) {
            LOG.log(Level.SEVERE, "Failed saving details in Vault {} ", e.getMessage());
    }
...
Code to read data from the vault
@Autowired
   private VaultOperations vaultOperations;


   public void setVaultOperations(VaultOperations vaultOperations) {
       this.vaultOperations = vaultOperations;
   }


   public String getPassword() {
       VaultResponseSupport<VaultKeyValueDTO> vaultResponse = vaultOperations
               .read("secret/data", VaultKeyValueDTO.class);


       if (Objects.nonNull(vaultResponse) && Objects.nonNull(vaultResponse.getData())
               && Objects.nonNull(vaultResponse.getData().getData())) {
           String password = vaultResponse.getData().getData().getPassword();
       }
       return null;

   }
Code to delete the data from the vault
try {
       vaultOperations.delete("secret/metadata/"+key);
} catch (Exception e) {
  LOG.log(Level.SEVERE, "Failed deleting details from Vault {} ", e.getMessage());
}
Comment down if you have any issues.
